|
I was commissioned by a friend to make a set of 3D maneuver gear from the increasingly popular anime, Attack on Titan. I will admit, it wasn't until after I made these that I sat down and actually watched the anime, though I had heard about it and seen other cosplayers with various costumes and whatnot (even though my brothers and friends kept telling me to watch it constantly lol). When I saw the concept art for it, though, it looked really interesting and a good bit of fun. Word of warning: this anime is not for the squeemish. I've definitely seen worse, but it does get pretty violent and bloody.  Now, there is a major difference between the gear from the anime and the gear from the manga, so right off the bat my friend said he specifically wanted the anime ones. With that, I got straight to work. Due to time constraints and a lack of PVC board, we both decided on foam. This was going to a convention and it needed to survive the jammed hallways, and it needed to be light so that it wasn't a burden. I also had about two weeks to do this in, while I was finishing up the Giant Robot build as well, so I cut whatever corners would be safe and did a ton of improvising. Tally ho!  First up was the air canisters. I grabbed two 2" ABS pipes, end caps, and a couple wooden banister toppers that fit nice and snug inside. The pipes I rounded with the belt sander after cutting them to size, put an end cap in one side and the toppers in the other, and glued it all down with epoxy.  To that I epoxied a T-joint PVC pipe, and then (as you can see) I used electric tape to attach some milk lids to the end. I used the tape to cover up most of the ridges on the lids, but kept some sticking out for effect. After that I epoxied small bits of pen tubing (just like the M8 - stuff is versatile!) to each side, so my friend could add the tubes to it when he got it.  I did what I could to help make it easier to tell which side was which, alternating the pen bits just in case. Once that was done it was straight to the paint: black base coat with a layer of clear, then several light dustings of silver metallic to get a better metal look. Learned that one from Stan Winston School. [/shameless plug]   While those dried, I started on the sheathe bits. Because this was being made out of foam, we were both a bit worried about bending - especially at a convention. I thought of a couple of ways to support the inside, then decided to make the entire thing in several sections. First came the top.  Based on the measurements we agreed on, I decided it would be easiest to make the front and all the supporting sections out of the 1" foam I had (though the supporting sections would be two layers of that stuck together). Given the measurements of the swords, I went with 1/2" slits, set 1/2" apart, with 1" in the middle for spacing. These I marked out and cut with my trusty knife.  I then built up a box shape behind the front pieces, which attached to the first support section. I made these support bits a little wider, since in the anime they are actually supposed to be large metal strap-things meant to hold the two halves of the sheaths together. I also cut out one slit on each side to allow for the sword, which we'll get to. Once those were connected, I finished cutting out the rest of the sections.  That should also give you a better idea of what I mean for the sections. Had I done that all one single bit of foam, it would easily bend and quite likely break apart if someone hit it hard. Each of the sections were glued as before, though I left the front off for the moment until the friend was able to show me how it would connect to the strapping that was being made for the costume. Just like the front box bit, each of the 2" thick sections got a slit cut out to accommodate the sword, and the longer ones on top got a hole cut out for the canisters.   While I was waiting on the attachment method, I got to work on the actual swords. These were to be removable from the sheaths, though the blades didn't need to come off, so it could be one solid piece. That made it a ton easier for me. Grabbed some 1/2" thick pine planks for the blades and some 3/4" thick blocks for the controller hilts, then hit up a local bike shop for some cheap brakes.  The blades I cut out with my trusty band saw, then used the router with a round bit on the "business" side. The actual blade is angled much like a box cutter blade or a razor blade (in fact its design is exactly like the former) but, again, convention safe so no sharp edges. The hilts I cut out with the scroll saw, then used the router again to round the edges where it is held. There should also be a cover over the upper curved bits (actually those should also be trigger buttons) but I didn't have anything that would look good enough and I wanted to make sure the friend's fingers could fit. Remember how I'm in a hurry? Anyway, I used a hack saw to etch in the segmented bits on the blades, then cut a groove in each grip and used the ever wonderful Titebond 3 to glue the two parts together.  Epoxied some 1/16" styrene bits for quick detailing, then sanded down the bumps left from the router. Once that was done, I got to the fun bit: cutting off the part of the brakes I needed. The kind of brakes I was able to find (cheap, yet similar to the look) unfortunately weren't quite right on the attachment bits, so I had to cut off the levers. I also didn't have anything that could safely hold it open while I cut it, so dremel and air-powered cutter were out. I had to use the hack saw again, which took ages (and gave me a heart attack a couple times), but I finally got them off. Once that was off I epoxied each to the swords. I don't have any pictures of swords being painted (down to the wire at this point so was too rushed to remember) but they got the same treatment as the air canisters: black base, clear coat, then several light dustings of silver metallic.  While that paint was drying, I put in a few sword "blanks" (more like the ends, really) as placeholders in the sheath slots not in use. I also threw on some craft foam in areas that still needed detailing. My friend also got back to me on how these would be attached, which was basically a cloth covered patch with two holes in them, strengthened with rivets. My description sucks, but I hit up Walmart and found some wall hooks that worked perfectly. Of course, they had some pointlessly massive plastic bits on them I was having a hell of a time deciding how to remove without damaging the metal hooks, but once I got them out of the packaging I discovered a really easy way to take them apart. So I did.   Glued up the tops and cleaned up the edges of those cuts, though I didn't have to do much as they would be covered by the legs. Once those were in it was off to painting straight away! This was literally two days before the event, and the day before I had to be absolutely done before five - epic Mass Effect photoshoot with Legion! *cram cram cram*  Stayed up extremely late touching up all the finished parts and getting the sheathes at least to the main color, since I wanted to give it as much time as possible to set and avoid as much tape mark residue as possible. This got a grey primer coat, then a tan color for the main section.  The next morning, as early as I could muster, I taped everything off and sprayed a brown layer, with a silver coating on the blade blanks. The result?  A look nearly identical to the screen captures I got - these colors are nearly dead on. I squealed. Of course, that morning while the paint was drying I literally threw together the engine that hangs off the characters' back. Easier than I expected, though not perfect, and I learned a cool trick! First up, the sides.  Lucky me, I had a bowl that was the exact size of the larger circles, so that made things easier there. The inner circles though were a bit harder. Cut the larger ones out, then looked for something that was the width of the inner bit, but realized I would still have to measure it since I wanted the inner bit to be a strip. By a stroke of luck, my painter's tape was currently the exact width, which gave me a fantastic idea! By marking where the end of the tape was, pulling it off, and cutting at the mark, I now had a strip of tape exactly as long as the circumference of the inner circle. Go figure! Marked out and cut two strips of foam, glued them in, then quickly cut out the connection points on the back of each. 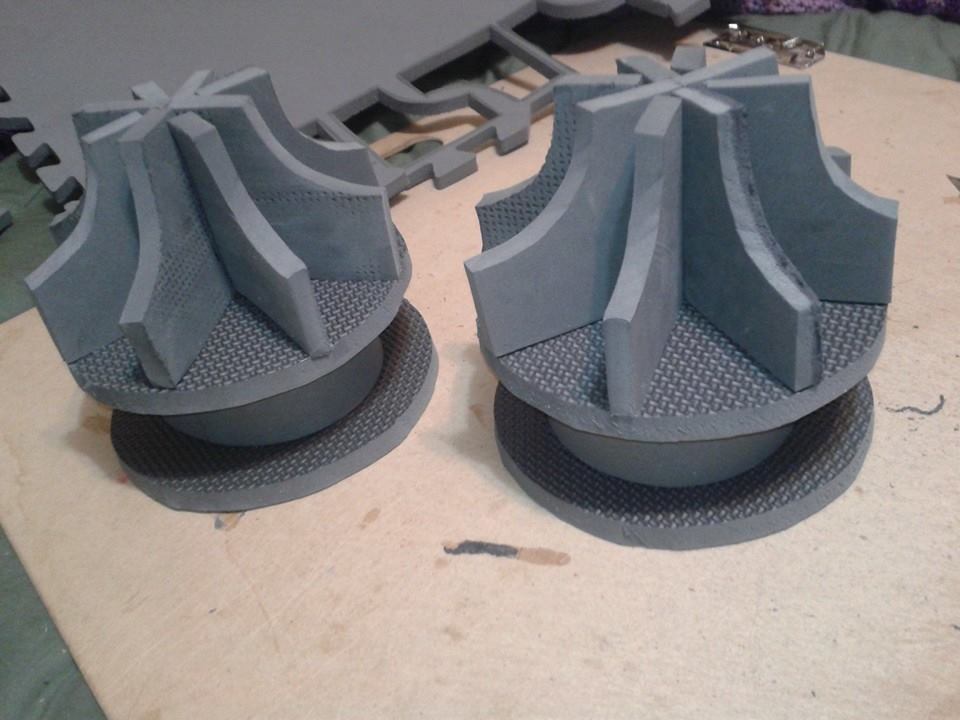 You can see the one on the right that I used to trace out all the others. You can also see that I sanded down most of the texture pattern on them, which I should have also done on the circle bits, as well as shortening the backs of quite a few of them so they'd all fit right. From here I was running out of time, so again I only have one other picture, and that's of it assembled. For your sake, I'll tell you what I remember. Inside the circle sections I added small square bits of foam at the same points of the shaped back section. From there, I made a box, a can-like thing with a port on one side, and a quick but effective attachment section to hold it all together. Quick and dirty description, but here it is!  It's not very clean, and I would have liked to make it look a lot more like it should, but again I was extremely strapped for time and just needed to finish. The engine bit got the same paint treatment as the swords and canisters: black, clear, silver. I also did some design work with the wood burning tool, to make it look at least a little better. Sadly, I've only got the one completed picture because I had to immediately hand it off to my friend. I was out of time, and the engine still smelled strongly of paint. There were still a few things that were left to do, but they would be covering those bits. I did leave him with some velcro to make it easier to attach the engine. Anyway, here's the finished product!  One picture, and it's a bad shot, but hey. I finished it, my friend loved it, and it worked. One of these days I may take some time to make a proper one. For now though, I'm proud of this one. Despite the rushing I think it turned out pretty good. Not perfect, that's for sure - but still pretty good.
0 Comments
|
|


 RSS Feed
